 Store Location
How to Frame-In Window and Door Openings in Log Siding Cabins
Adding windows and doors to cabins built with log siding walls is not as difficult as it may sound. There is no sawing through full logs to create the openings because they are made just like openings for conventional framing. Framing-in windows and doors is faster and easier in cabins constructed with either pine or cedar log siding.
Follow the sequence of steps below to get an overview of this process by:
- Putting up conventional 2x4 or 2x6 stud framing
- Make the appropriate window openings and seal with window installation
- Frame up the door openings and seal with door installation
- Add the OSB or similar material and insulation to framing
- Install the log window and door trim
Once these steps are finished, you can add siding to the exterior of the framing and insulation between the studs. The house wiring and plumbing are put into place at the appropriate time by the professionals who coordinate with the carpenters. That’s all there is to it and keep reading below.
Framing the Walls Comes First

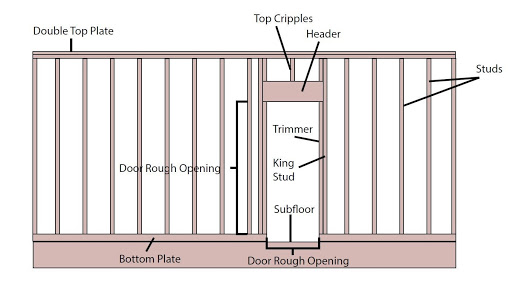
This illustration shows how window openings are created with supports under the headers and windows sills to stiffen the walls.
The complete window construction is covered in the next section. The OSB board or similar material is nailed to the walls and the openings will be cut out to the right size.
Making Window Openings That Hold Up
Before the siding and trim are added to the exterior walls, the window openings must be built to code to be fully functional. Take a look at the standard way to frame-in windows:
A well-built window frame supports the weight placed on the wall by using studs to transfer the load. The opening is made slightly larger than the window to allow for expansion. The components of the structure and their purposes are:
- Cripple studs carry the load from the top plate down to the header and from the sill to the bottom plate.
- A window header add strength to the walls
- Top plates hold the studs in place
- Window sills anchor the bottom for the window
- Studs support the walls and all loads above them
- Bottom plates are nailed to the floor to secure walls
King and jack studs are placed at the side for the frame opening to support the header and transfer weight to the floor. Check with your local building codes to see if this diagram needs to be modified.
|
“Adding windows and doors to cabins built with log siding walls is not as difficult as it may sound. There is no sawing through full logs to create the openings because they are made just like openings for conventional framing.” |
Making Door Openings
Measure the windows and doors accurately before starting the process. The rough openings are made wide enough for the door jambs, the door or window, and sealing material. You will need to saw the cripples, headers, and king studs to the right length and nail in place. This YouTube video provides specific instructions for creating window and door openings.
Adding the Exterior Trim
Log trim is installed after the doors and windows but before putting on the exterior log siding. Galvanized screws are used to hold the trim in place, and all trim is caulked after installation. Exterior log trim is available in these sizes:
- 2”x 4” Pine D Trim
- 2”x 6” Pine D Trim
- 3”x 4” Pine D Trim
- 4”x 4” Pine D Trim
- 3”x 4” Cedar D Trim
- 4”x 4” Cedar D Trim
Match the size of trim to the size of the log siding you are using to create the perfect ‘look.’
Install the Log Siding
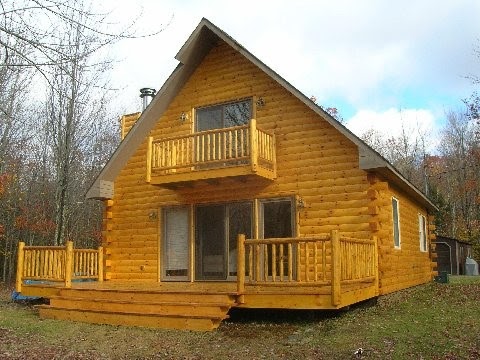
Installing the log siding is the next step after the window, door, and trim installation. Follow the mill’s instructions closely when putting up the material for the best results. It’s all made easier with its tongue and groove/end-matching design. The cabin under construction shown here is the same cabin at the beginning of this article.
References and Resources:
How to Frame Windows and Doors


