 Store Location
How To Make An Exterior Door For A Log Cabin
Making an exterior door from scratch for a log siding or full log cabin is a rewarding project. It involves buying the materials, constructing a sturdy wooden door, fitting it into the door framing, installing the hardware, and finishing it. You can follow a standard door plan or create a unique design for the cabin.
Choosing Your Log Cabin Door Style
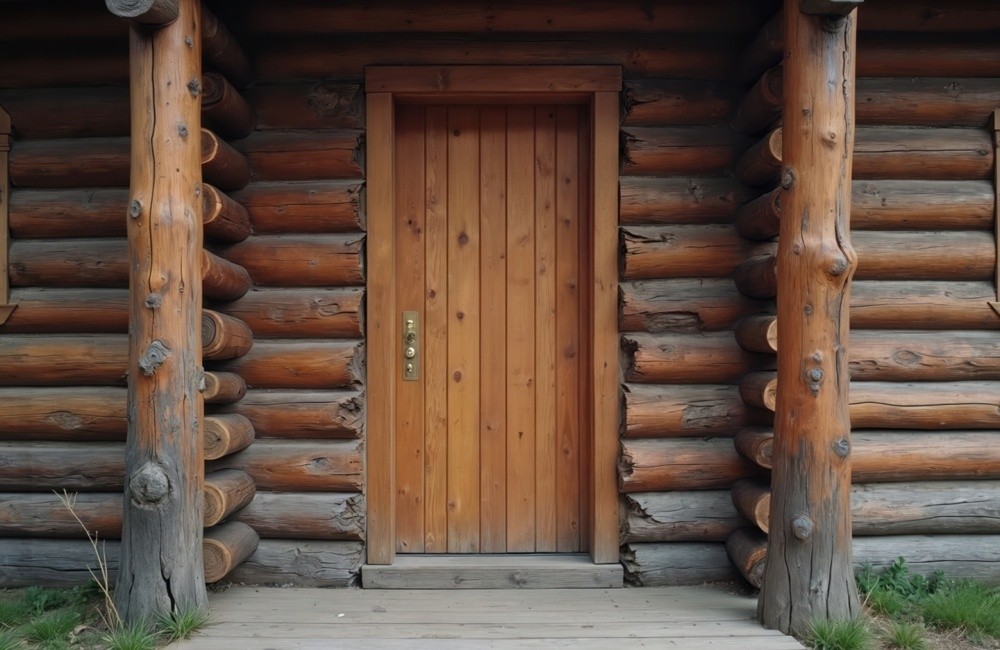
Popular styles of exterior wood doors for log cabins include flush, panel, partial glass, and barn door. They need to be thicker and sturdier than interior doors to stand up to the elements, especially in colder climates. Exterior doors must be durable in construction and finishes to weather storms.
- Flush doors: Have a smooth, flat surface, ideal for modern or minimalist designs, and may use veneers in their construction.
- Panel doors: Feature raised or flat panels between horizontal rails and vertical stiles, a versatile traditional look.
- Doors with glass: Glass, either clear or opaque, can be added to the top portion of a door to view through or serve as a decorative touch.
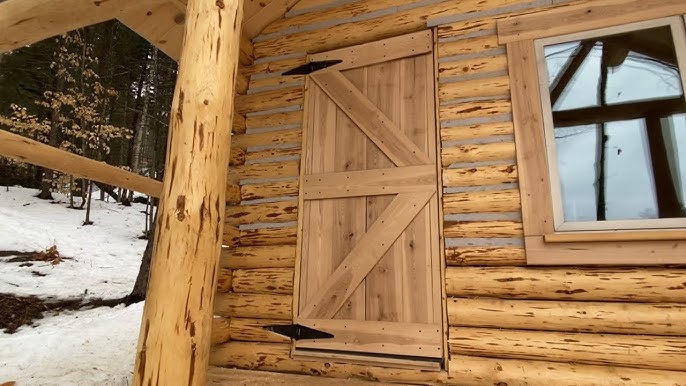
- Barn doors: These doors are a rustic style, often made to look like a rough barn door.
Purchasing Materials And Gathering Tools
Your door plans will include purchasing the materials and gathering the tools. Start with weather-resistant wood (1 ½” to 1 ¾” thick), such as cedar, pine (most economical), oak, or fir, exterior-grade screws, and or nails. If you need to glue boards together, purchase the best wood glue for the project, and two or three long clamps.
Purchase heavy-duty hinges, a door handle with lock, door knob, hole cutting kit, and weather stripping. You also need exterior finishing sealant, such as polyurethane or a similar product, and several grits of sandpaper or discs.
The required tools are power saws for sawing boards to length and width, a drill, and bits. You will need a measuring tape, pencil, level, square, sander, glue, and clamps.
“Making an exterior door for a log siding or full log cabin is a rewarding project.”
Steps For Creating Your Log Cabin Door
 The simplicity or complexity of making your own exterior door depends on your woodworking knowledge and skills. This article assumes you have already built the door frame including the jambs. Ready-made doors from a DIY store will be fully installed in the frame and jambs, including holes cut out and hinges mounted. Here, you do not have this luxury. Our example is a solid door without glass, and the door frame/jambs are already built and installed.
Measure and Plan
- Measure the rough opening: Measure the opening to determine the height and width of your door. Standard door height is 6’ 8” (80”) and yours may vary in size. The frame opening height and width should be ¼” more than the door to allow for a 1/8” gap all around. Ensure all corners of the opening are square; if not, square them up.
- Create a pattern: Make a full-size template of the exact door opening using cardboard. Account for necessary gaps for weather-stripping and the door to swing freely. The top and side door stops may need placing or moving to allow for the door’s width.
- Design the door: A traditional wood door consists of vertical boards held together with glue and dowels between boards (or biscuits or pocket holes and screws). Horizontal, vertical, or diagonal trim boards may be used around the top, bottom, and sides.
Construct the Door
- Cut the vertical boards: Cut the main vertical boards to the height of your pattern. Lay them flat and tight together to form the door. Measure the width, and select the board or boards to rip to the correct door width.
- Gluing and clamping: Use dowels between the boards (or biscuits or pocket holes with screws) for extra strength to hold the board together. Apply adequate wood glue and clamps on the sides with a narrow board between the door edges and clamps.
- Notch the door frame and door sides for hinges: If the frame has the hinge notches already cut out, your job is simplified. If not, you must notch out for the 2 or 3 hinges in both the door side and the frame. They must match exactly to position the door correctly so it is level and swings freely. Skip this part if you want large exterior hinges.
- Cut the holes for the door knob and closer mechanism: The door knob will come with directions for cutting out the holes. You can also buy a guide tool to professionally cut them out. Install the parts after the door is finished with an exterior stain/sealant.
Finishing And Installing Your Log Cabin Door
Now it’s time to finish and install the door. Sand the entire door and apply several coats of a high-quality exterior stain/sealant to protect it from the elements. Be sure to seal the top, bottom, and side edges for moisture protection. Attach the hinges to the edge of the door and then to the door frame. Ensure the door is level and plumb when hung.
Install the hardware by fitting the handle, latch mechanism, and any locking hardware. Apply weather-stripping around the edges of the door or frame to seal gaps and prevent drafts. By following these steps, and paying close attention to the unique requirements of log construction, you can create a durable and functional exterior door for your cabin.
Care And Treatment Of An Exterior Wood Door
To care for an exterior wood door, clean it regularly with mild soap and water, dry it thoroughly, and inspect it annually for finish wear. Reapply a compatible stain/sealant to exposed areas as needed to protect against sun and moisture, while also lubricating hardware and checking weatherstripping for longevity. Focus on maintaining the topcoat to prevent wood damage, rather than deep-stripping and restaining frequently.


